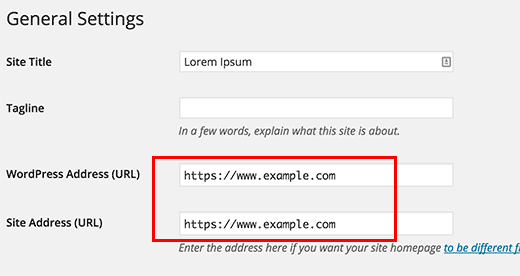
If you are starting a new site and/or want to use HTTPS everywhere on your site, then you need to update your site URL.
You can do this by going to Settings » General and updating your WordPress and site URL address fields.

Now if you’re adding SSL to your existing site, then you need to setup WordPress SSL redirect from HTTP to HTTPS.
You can do this by adding the following code in your .htaccess file:
<IfModule mod_rewrite.c>
RewriteEngine On
RewriteCond %{SERVER_PORT} 80
RewriteRule ^(.*)$ https://www.yoursite.com/$1 [R,L]
</IfModule>
Don’t forget to replace yoursite.com with your site URL.
If you are on nginx servers (most users are not), you would add the following to redirect from HTTP to HTTPS:
server {
listen 80;
server_name yoursite.com www.yoursite.com;
return 301 https://yoursite.com$request_uri;
}
By following these steps, you will avoid the WordPress HTTPS not working error because all your site URL and content will be on SSL. You may also install some SSL plugin to do so like: https://wordpress.org/plugins/really-simple-ssl/.
If you want to add SSL and HTTPS on your WordPress multi-site admin area or login pages, then you need to configure SSL in wp-config.php file.
Simply add the following code above the “That’s all, stop editing!” line in your wp-config.php file:
define('FORCE_SSL_ADMIN', true);
This wp-config.php SSL trick works for single sites as well as multi-sites.

